How Can We Help?
Update E-mail Settings in Mozilla Thunderbird
Mozilla Thunderbird
- Open Thunderbird to the main e-mail screen.
- Open Thunderbird’s Account Settings window with the following instructions:
- Hold down the ALT key on the keyboard.
- While the ALT key is being held down, also press the T key, to open the TOOLS menu.
- Once the TOOLS menu is open, click on Account Settings to open the Account Settings window.
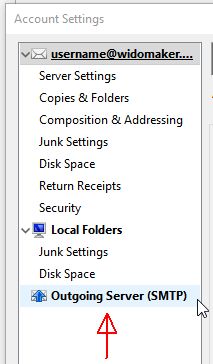
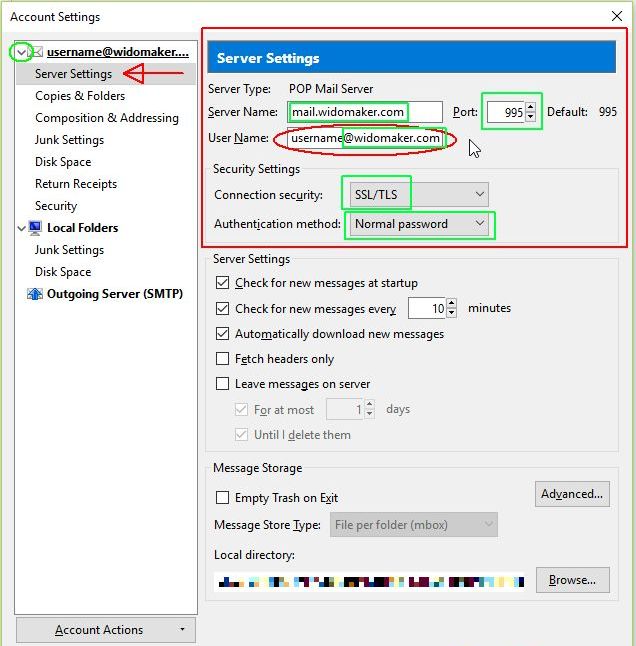
- Once the Account Settings window is displayed, click on Server Settings, located on the left side of the window, under your e-mail address. The image, below, points to Server Settings using a red arrow pointing to the left.
Instructions continue after the image, below…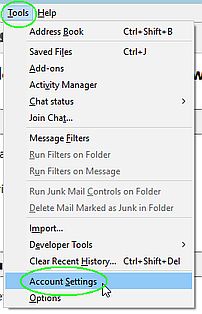
- Edit the “User Name:” field. Previously, it only contained your username. Make sure that it contains your full e-mail address, instead of just the username, by adding “@widomaker.com” (without quote marks).
- Make sure that the other settings match what is highlighted with green rectangles, in the image, below.
- Server Name: mail.widomaker.com
- Port: 995
- User Name: Your full e-mail address (all lowercase letters)
- Connection security: SSL/TLS
- Authentication method: Normal password
- Edit the Outgoing Server Settings…
- Click on ✉ Outgoing Server (SMTP), located at the bottom of the left side column, in the Account Settings window…
Instructions continue after the image, below…
- Select the Widomaker SMTP server, from the list, then click the EDIT button, to the right side of the window, as shown in the image, below…
- Edit the “User Name:” field, located in the SMTP Server window. Previously, it only contained your username. Make sure that it contains your full e-mail address, instead of just the username, by adding “@widomaker.com” (without quote marks).
- Make sure that the other settings match what is highlighted with green rectangles, in the image, below.
- Server Name: smtp.widomaker.com
- Port: 587
- Connection security: STARTTLS
- Authentication method: Normal password
- User Name: Your full e-mail address (all lowercase letters)
- Once you have made the necessary changes, in the SMTP Server window, click OK.
Instructions continue after the image, below…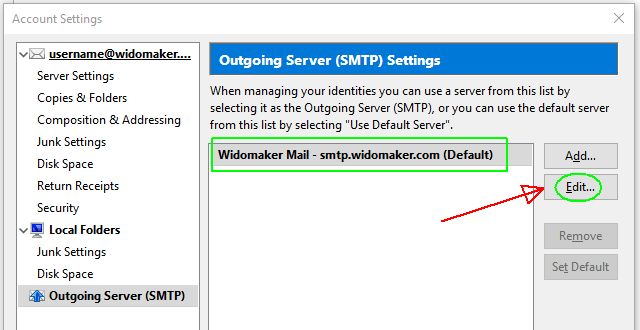 Instructions continue after the image, below…
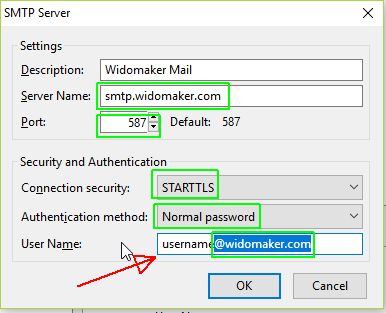
- Click on ✉ Outgoing Server (SMTP), located at the bottom of the left side column, in the Account Settings window…
- The Account Settings window should be displayed. Click OK at the bottom of the Account Settings window, as shown in the image, below…
- All done! Now test checking and sending mail to confirm Thunderbird is working properly. Sending yourself a test message is an easy way to test that the settings are correct and Thunderbird is working properly.
Instructions continue after the image, below…
Thunderbird account settings.


Support the EFF!

Please support the EFF. They fight for your digital rights, and the rights of smaller ISPs, like Widomaker.