How To Forward Suspicious Email Messages For Evaluation
If you receive a suspicious e-mail message, you might want to have it evaluated, to confirm if it is legitimate, or not, and potentially report it in an appropriate way.
First, some definitions…
Phishing is the act of sending fake, misleading, or fraudulent messages in an attempt to trick recipients into providing personal information including login credentials, sensitive or financial information, or both. Phishing messages can contain links to fraudulent websites that harvest sensitive information. Sometimes messages contain malware that captures login credentials once an attached file is opened.
E-mail SPAM, also known as junk e-mail, is unsolicited messages sent in bulk by e-mail (Unsolicited Bulk E-mail, UBE), frequently advertising a product for purchase. Note: Not every unwanted e-mail message is spam. If you know the sender, personally, the message is *not* spam. If you have/had a business relationship with the sender, the message is *not* spam. A message is spam only if it is both Unsolicited (I didn’t request it explicitly or implicitly) and Bulk (the same message was sent to many people at once).
Malware Spam or MalSpam is the term used to designate malware that is delivered via email messages.
Where Can I Report a Suspicious Message?
If you’ve received a suspicious message, claiming to be from Widomaker, or another organization, that might be malicious or a phishing message, and you want to confirm if it is legitimate, or not, forward the e-mail as an attachment(*) to our Tech Support Helpdesk.
(*) See instructions, further below, for How to Forward a Message as an Attachment.
If you’ve received a SPAM, or Malspam, message and want to report it to Widomaker’s spam filtering service, you may use one of the following methods:
- Log into Widomaker Webmail and mark the messages as spam (see below).
- If your e-mail (client) software is configured to use IMAP, you can move the spam messages to the “Spam” folder. That will mark it as spam.
- If your e-mail (client) software is configured to use POP3, you must, first, configure it to leave copies of messages on the server for several days (usually between 3 to 15 days is appropriate), then login to Webmail and mark the messages as spam.
How do I mark one or more messages as spam, in Widomaker Webmail?
- Log into Widomaker Webmail.
- Select the messages you would like to mark as Spam.
- Click the Spam button from the message list toolbar. The message is moved to your Spam folder.
Clicking the Spam button results in two actions. The first action is visible. The marked message will be sent from its current folder to the Spam folder where it will reside for 30 days, at the end of which time it will be automatically deleted. The second action is invisible to you. When you click the Spam button, Webmail sends information to the spam filtering engine so that the filtering rules can be updated to catch future spam messages similar to the one marked. In this way filtering can be continuously updated and improved to reflect the current trends of spammers.
Note: Everyone benefits when you mark unsolicited and offensive messages as spam, as opposed to just deleting the offending email.
If you’ve received a spam message and want to report it to a spam fighting organization:
- Report spam messages to the Spamcop.net spam reporting service. This is an effective organization to report spam.
- Report spam messages to the FTC, by forwarding the message, as an attachment, to spam@uce.gov.
If you’ve received a phishing message and want to report it to an anti-phishing organization:
- Instructions to report phishing messages, or links to phishing websites, may be found in our Weblog article on Phishing.
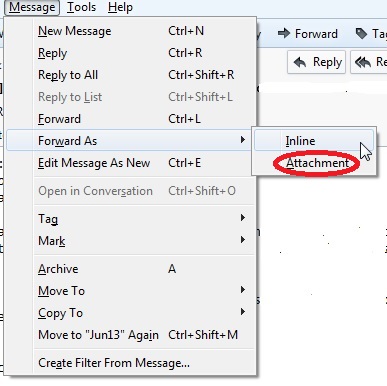
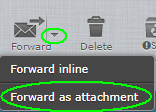
How to Forward a Message as an Attachment
Outlook 2010, 2013, 2016: (1) Select the e-mail to forward, (2) on the Home tab, click the more respond options, (3) click on Forward as Attachment.

Apple Mail (macOS): (1) Select the e-mail to forward, (2) click on Message in the Menu Bar, (3) click Forward as Attachment.

Thunderbird: (1) Select the e-mail to forward, (2) on the menu bar, click on Message > Forward As > (3) Attachment. If your Thunderbird menu bar is not visible, you may also (1) right-click on the e-mail to forward > (2) click on Forward As > (3) Attachment.
Widomaker Webmail: (1) Select the e-mail to forward, (2) click the downward pointing arrow to the right side of the Forward button, on the message menu bar, (3) click Forward as attachment.
Where Can I Find Other Tips for Reducing Spam?
The CISA website has a Security Tip article for Reducing Spam.
Where Can I Find Other Tips for avoiding being the victim of a phishing attack?
The CISA website has a Security Tip article for Avoiding Social Engineering and Phishing Attacks.
E-mail Error Connecting to Plesk Hosting Server: Authentication methods not supported (Outlook or Android)
Symptoms
The following error appears in Outlook when attempting to send mail using the Plesk mail server:
None of the authentication methods supported by this client are supported by your server.
The following error message appears in Android mail client:
Server does not support authentication.
Causes
- The mail client does not have the proper encryption type selected, for the outgoing server, which makes the connection fail.
Resolution
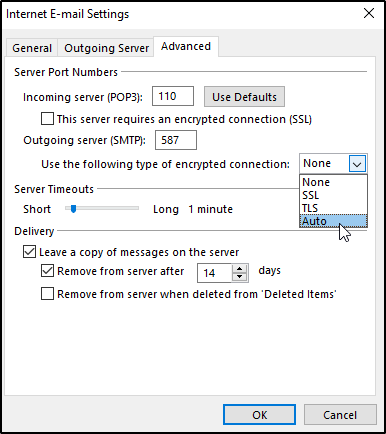
In the settings of the mail account, specify the correct connection encryption type by changing “none” to TLS/Auto.
For Microsoft Outlook:
- Open Outlook settings: Click File > Account Settings > Account Settings
- Select your email account from the list and click Change. Email settings should be displayed.
- Click More Settings… button.
- On the Outgoing Server tab, enable the option, My outgoing server (SMTP) requires authentication, and select Use same settings as my incoming mail server.
- On the Advanced tab, set the Outgoing server (SMTP) to use port 587 and set Use the following type of encrypted connection to Auto.
- Click OK to update the settings.
- Click Next and then, click Finish.
Outlook 2010 or later, select TLS/auto
For Android mail client:
- Change Outgoing Server Security type from None to TLS (Accept all certificates)

Android Mail Client, select TLS/auto
FAQ: How Do I Access My Email Account from All of My Computers and Devices? How Do I Switch from Using POP to IMAP?
If you have several computers, laptops, and other devices, like smartphones or tablets, you might want to read and send e-mail on any, or all, of them. Continue reading to find out how to accomplish that. First, some background information…
POP and IMAP are two methods to access email.
What is POP (POP3)? [1]
POP works by contacting your email service and downloading all of your new messages from it. Once they are downloaded onto your PC or Mac, they are deleted from the email service. This means that after the email is downloaded, it can only be accessed using the same computer. If you try to access your email from a different device, the messages that have been previously downloaded won’t be available to you. Sent mail is stored locally on your PC or Mac, not on the email server. A lot of Internet Service Providers (ISPs) give you email accounts that use POP.
What is IMAP? [1]
IMAP allows you to access your email wherever you are, from any device. When you read an email message using IMAP, you aren’t actually downloading or storing it on your computer; instead, you’re reading it from the email service. As a result, you can check your email from different devices, anywhere in the world: your phone, a computer, a friend’s computer. IMAP only downloads a message when you click on it, and attachments aren’t automatically downloaded…
Traditionally, Widomaker e-mail accounts were configured to use POP. Once the E-mail Migration of 2018 is complete, customers with an e-mail address that ends in widomaker.com (or tni.net) will be able to choose to configure their e-mail software to use POP or IMAP. Customers that want to access their e-mail from multiple computers, and other devices, would configure all of their computers, and other devices, to use IMAP.
Switching an existing computer, or device, from using POP to IMAP requires setting the e-mail account up, as if it was the first time, and selecting the IMAP account type during the setup process. First, back up your existing e-mail messages, to avoid accidentally deleting all of your e-mail, when making changes to your e-mail software’s account settings. Don’t skip this step unless you don’t care about keeping your existing e-mail messages!
If you currently use Microsoft Outlook (configured for POP), we do not recommend configuring Microsoft Outlook to use IMAP. Microsoft Outlook has a history of poor IMAP support. Widomaker does not offer technical support for Microsoft Outlook, if it is configured to use IMAP. If you are a current Microsoft Outlook user and would like to use IMAP, then we suggest that you switch from Microsoft Outlook to Mozilla Thunderbird, which has good IMAP support.
Unfortunately, there are some technical issues to overcome if you want to import your previous Microsoft Outlook messages into Mozilla Thunderbird. In this case, you may wish to contact a local computer shop for assistance. Mozilla’s website explains…
To use Thunderbird’s import wizard, you must use an older version of Thunderbird, because the wizard is disabled for Outlook […] in Thunderbird version 38 and newer versions. Install version 31.8, import your data, then upgrade to the latest version of Thunderbird via the built-in update mechanism.
If you currently use Mozilla Thunderbird (configured for POP), and want to switch to using IMAP, there are instructions on Mozilla’s Support website [Switch from POP to IMAP account].
Briefly, the steps are as follows…
1. Disable your POP account in Mozilla Thunderbird
In order to avoid duplicating the checks for new messages, first go to your account settings by opening the Tools [hold down the ALT and press T] > Account Settings menu, then select Server settings and un-check both Check for new messages at startup and Check for new messages every XX minutes.
2. Create the IMAP account
- Open the File menu by holding down the ALT key, then pressing the F key at the same time.
- Click New then Existing account.
- Set up your account. When it asks if you want to use POP or IMAP, select IMAP (remote folders).
3. Transfer your local messages to the server
Be sure you have backed up your existing e-mail messages, as directed at the start of this article. A mistake made at this step could cause permanent loss of all of your e-mail. You’ve been warned.
If you have messages or folders in your POP account that you would like access via your IMAP account, simply select them and move them to your IMAP account by dragging and dropping. Depending on the number of messages that you move, it may take several minutes [or hours] to be uploaded. Be patient; you are nearly finished.
Alternatively, you can move your existing messages to the Local Folders account, instead of moving them to the IMAP server. This option would take the least amount of time.
4. Delete your POP account (optional)
Be sure you have backed up your existing e-mail messages, as directed at the start of this article. A mistake made at this step could cause permanent loss of all of your e-mail. You’ve been warned.
If you are converting your email account to IMAP from POP, you can delete the POP account when you are completely sure that you have moved all your important messages to the IMAP server (or into your Local Folders)…
- To delete your POP account in Mozilla Thunderbird, open your Account Settings by opening the Tools menu (hold down the ALT and press T), then selecting Account Settings, then select your POP account.
- Click on the Account actions button at the bottom and select Remove Account.
4. All done.
Footnotes:
[1.] “What are IMAP and POP?” Microsoft, May 18, 2018, https://support.office.com/en-US/article/What-are-IMAP-and-POP-ca2c5799-49f9-4079-aefe-ddca85d5b1c9
Backup Your E-mail (HOWTO)
It’s a good idea to regularly make backups of your important documents and files. In addition to normal computer backups, for Windows or MacOS, you may want to also backup your e-mail messages. Not all computer backup programs have the option to include e-mail messages. Additionally, if you are not storing e-mail messages on your computer’s hard drive, because you use Webmail or IMAP (instead of POP3), typical computer backup programs would not be able to back up those e-mail messages.
Fortunately, there are some e-mail specific methods to back up e-mail messages. Including when the messages are stored locally on your computer’s hard drive, or when they are remotely stored on an e-mail server.
This article is focused, primarily, on users of Microsoft Windows, with Microsoft Outlook or Mozilla Thunderbird. Users of Apple’s MacOS, with the included Mail app, might consider exporting important mail folders to an external storage device.
[Recommended] One of the easiest methods to back up e-mail is to use the free MailStore Home software for Windows. With MailStore Home you can back up your local e-mail folders, on your computer, as well as any mail stored in IMAP folders, on the e-mail server. There are instructions available on their website. According to their web site…
MailStore Home lets you archive your private email from almost any email source and search through them extremely quickly. You will never lose emails again.
Use MailStore Home to Backup Your E-mail
MailStore Home
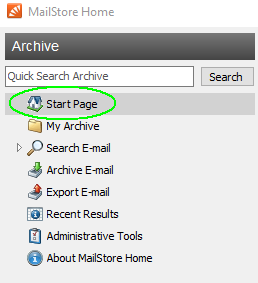
Once MailStore Home is open, it should display the Start Page. From the Quick Access menu, select Archive E-mail…
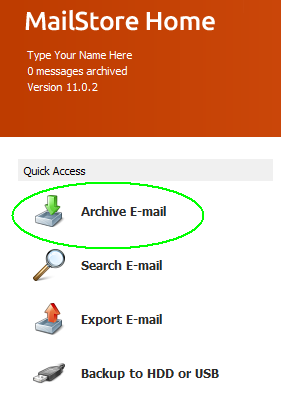
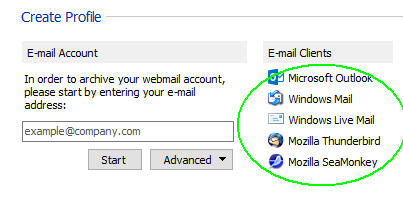
1. Create E-mail Client Profile
On the Archive E-mail screen, we will create two Profiles. One profile for your normal e-mail client software (Microsoft Outlook, Windows Live Mail, or Mozilla Thunderbird), and a second profile for the Widomaker e-mail server via IMAP. (If you have more than one e-mail address, you would create additional profiles.)
Select your e-mail client software from the E-mail Clients list and follow the onscreen instructions…
That will add your e-mail client to the list of Profiles…
![]()
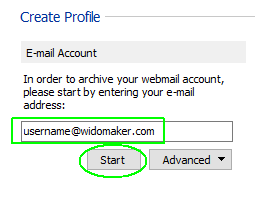
2. Create IMAP Profile
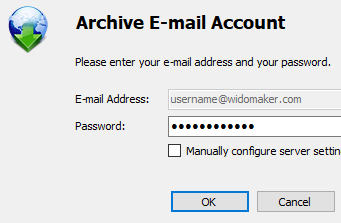
Enter your e-mail address into the Create Profile > E-mail Account field, then click Start. Provide your password, when prompted…
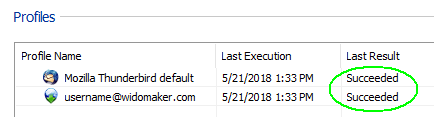
3. Archive Mail
Double-click each profile, one at a time, to start the archiving process. When both archive profiles have been run, they will display “Succeeded”…
4. Backup Mail to External Hard Drive or USB Storage Device
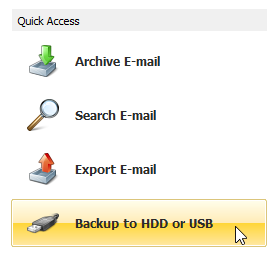
Open the MailStore Home Start Page by clicking Start Page on the left-side menu…
Click Backup to HDD or USB…
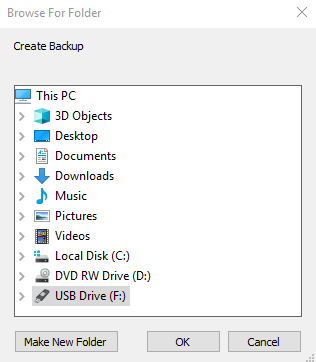
Select a device and location to save the backup. Choose an external hard drive or USB storage device…
5. All done!
[Advanced Users Only] Other Methods to Backup Your E-mail
There are also backup methods specific to the e-mail software you use. However, the difficulty level is more advanced. Try using MailStore Home, first, as described, above. A local computer shop may be able to provide assistance backing up your computer and/or backing up your e-mail using MailStore Home or the other options, below..
In order to proceed, you may need to know whether you are using POP3 or IMAP to access your e-mail. POP3 stores your e-mail on your computer’s hard drive. IMAP stores e-mail on the server, online, and only temporarily downloads a copy when you read a message.
Microsoft Outlook
Use the instructions found in the Backup Your Email article from Microsoft.
Mozilla Thunderbird
First, if you use IMAP instead of POP3, you need to configure Thunderbird to store and keep copies of the IMAP messages, from the server, in offline folders, then back up the Thunderbird profile using any available method…
- Right-click on your mail account name (in the left side column) and select “Settings”
- Select “Synchronization & Storage”
- Select “Keep messages for this account on this computer”
- Click on the “Advanced” button
- Make sure all the folders you need to back up are selected
- Click OK
- Select “Synchronize all messages locally regardless of age’
- Click OK
- Click the Menu icon ≡ (triple bar) > File > Offline > Download/Sync Now
Then, you can back up the Thunderbird profile. There are several methods you could use to back up the entire Thunderbird profile folder or just e-mail…
- Use the ImportExportTools Thunderbird extension by Paolo “Kaosmos”.
- Use the instructions for Backing up a profile on Mozilla’s Support website.
- Use the instructions found in the MozillaZine article for Thunderbird Profile Backup.
Update E-mail Settings in Microsoft Outlook 2010
![]()
Once the E-mail Migration of 2018 is complete, customers with an e-mail address that ends with @widomaker.com (or tni.net) will need to update the settings in their e-mail software. This article contains instructions for customers using the Microsoft Outlook 2010 (14.0) e-mail software, on their desktop, or laptop computer.
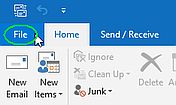
- Open Microsoft Outlook to the main e-mail screen.
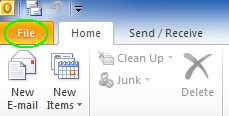
- Click the FILE menu at the top-left of the Outlook window, as shown in the image, below…
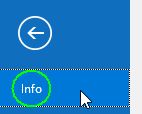
- Click INFO on the left side menu, as shown in the image, below…
- Click the Account Settings square, then “Account Settings…” in the drop-down menu, as shown in the image, below…

- Once the Account Settings (Email Accounts) window is displayed, select your e-mail account in the centermost window, then click the Change button, as shown in the image, below…
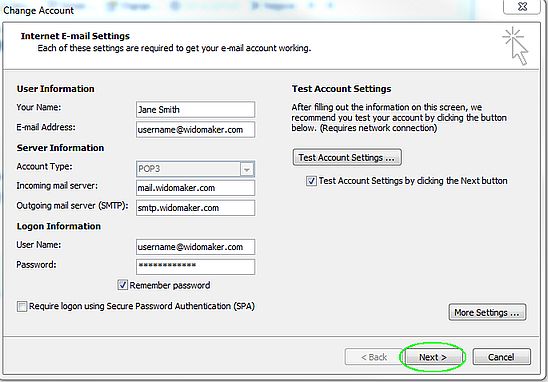
- Once the Change Account (Internet E-mail Settings) window is open, edit the “User Name:” field. Previously, it only contained your username. Make sure that it contains your full e-mail address, instead of just the username, by adding “@widomaker.com” (without quote marks).

- Make sure that the other settings match what is highlighted with green rectangles, in the image, below.
- Incoming mail server: mail.widomaker.com
- Outgoing mail server (SMTP): smtp.widomaker.com
- User Name: Your full e-mail address (all lowercase letters)
- Click More Settings in the bottom-right corner of the Change Account (POP Account Settings) window.
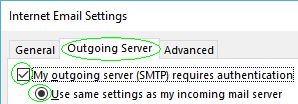
- Click the Outgoing Server tab. Verify that “My outgoing server (SMTP) requires authentication” is checkmarked ☑ and “Use same settings as my incoming server” is selected.
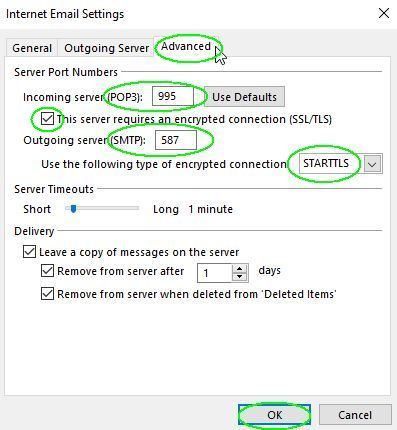
- Click the Advanced tab. Make sure that the settings match what is highlighted with green rectangles, in the image, below.
- Server Port Numbers
- Incoming server (POP3): 995
- This server requires an encrypted connection (SSL/TLS): ☑ (checkmarked)
- Outgoing server (SMTP): 587
- Use the following type of encrypted connection: Auto or STARTTLS
- Server Port Numbers
- Click OK.
- Click the Outgoing Server tab. Verify that “My outgoing server (SMTP) requires authentication” is checkmarked ☑ and “Use same settings as my incoming server” is selected.
- Click NEXT.
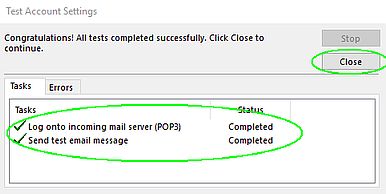
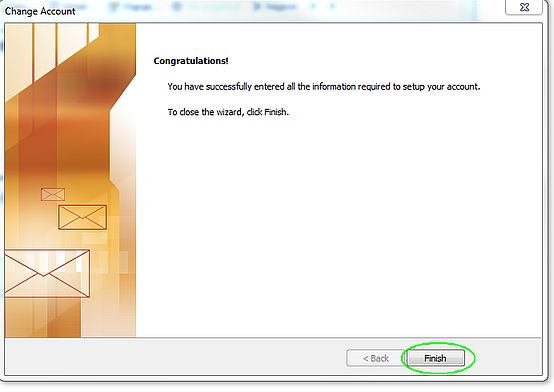
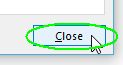
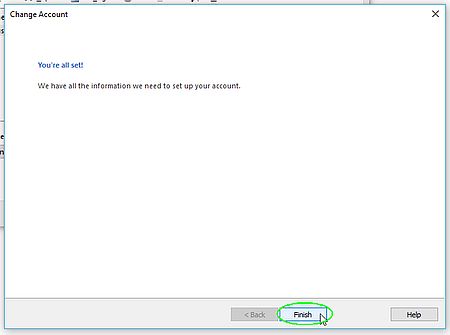
- Outlook will test the settings. Once the test has finished, click CLOSE in the Test Account Settings window.
- Click FINISH.
- Click CLOSE.
- All done! Now test checking and sending mail to confirm Outlook is working properly. Sending yourself a test message is an easy way to test that the settings are correct and Outlook is working properly.
Update E-mail Settings in Microsoft Outlook 2013 & 2016
Microsoft Outlook
Once the E-mail Migration of 2018 is complete, customers with an e-mail address that ends with @widomaker.com (or tni.net) will need to update the settings in their e-mail software. This article contains instructions for customers using the Microsoft Outlook 2013 (15.0) or 2016 (16.0) e-mail software, on their desktop, or laptop computer.
- Open Microsoft Outlook to the main e-mail screen.
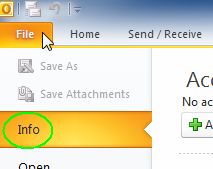
- Click the FILE menu at the top-left of the Outlook window, as shown in the image, below…
- Click INFO on the left side menu, as shown in the image, below…
- Click the Account Settings square, then “Account Settings…” in the drop-down menu, as shown in the image, below…
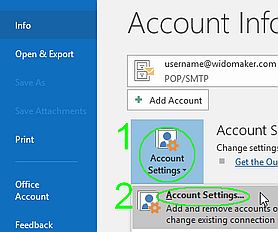
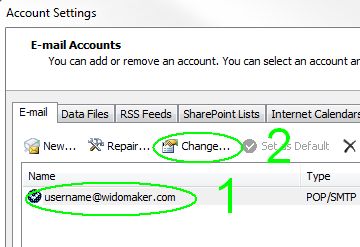
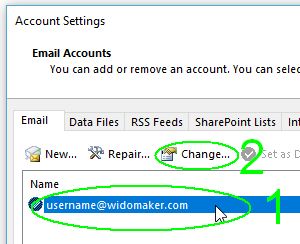
- Once the Account Settings (Email Accounts) window is displayed, select your e-mail account in the centermost window, then click the Change button, as shown in the image, below…
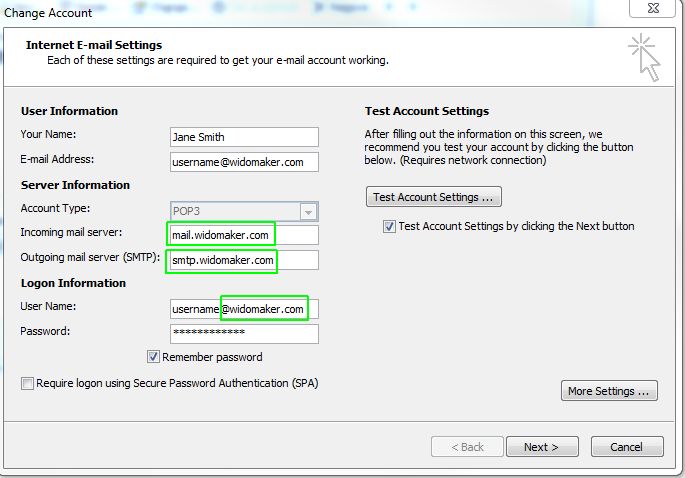
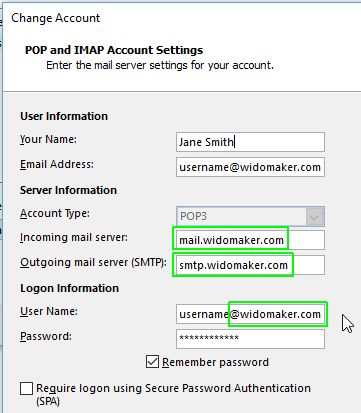
- Once the Change Account (POP Account Settings) window is open, edit the “User Name:” field. Previously, it only contained your username. Make sure that it contains your full e-mail address, instead of just the username, by adding “@widomaker.com” (without quote marks).
- Make sure that the other settings match what is highlighted with green rectangles, in the image, below.
- Incoming mail server: mail.widomaker.com
- Outgoing mail server (SMTP): smtp.widomaker.com
- User Name: Your full e-mail address (all lowercase letters)
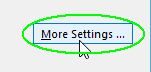
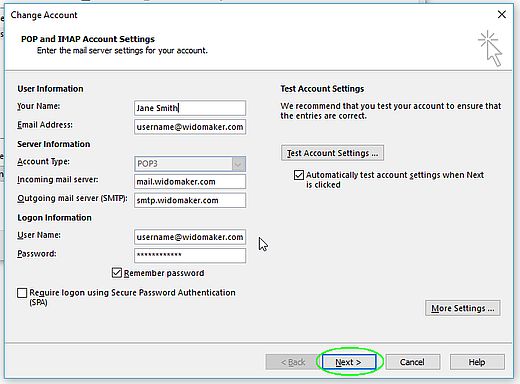
- Click More Settings in the bottom-right corner of the Change Account (POP Account Settings) window.
- Click the Outgoing Server tab. Verify that “My outgoing server (SMTP) requires authentication” is checkmarked ☑ and “Use same settings as my incoming server” is selected.
- Click the Advanced tab. Make sure that the settings match what is highlighted with green rectangles, in the image, below.
- Server Port Numbers
- Incoming server (POP3): 995
- This server requires an encrypted connection (SSL/TLS): ☑ (checkmarked)
- Outgoing server (SMTP): 587
- Use the following type of encrypted connection: Auto or STARTTLS
- Server Port Numbers
- Click OK.
- Click the Outgoing Server tab. Verify that “My outgoing server (SMTP) requires authentication” is checkmarked ☑ and “Use same settings as my incoming server” is selected.
- Click NEXT.
- Outlook will test the settings. Once the test has finished, click CLOSE in the Test Account Settings window.
- Click FINISH.
- Click CLOSE.
- All done! Now test checking and sending mail to confirm Outlook is working properly. Sending yourself a test message is an easy way to test that the settings are correct and Outlook is working properly.

