How to use Webmail
Once the E-mail Migration of 2018 is complete, customers with an e-mail address that ends in widomaker.com (or tni.net) will be able to use the new, and improved, Webmail system to send or receive e-mail. The new Webmail can be used as your primary method of accessing your e-mail, or it can be used in addition to a typical e-mail (client) program like Mozilla Thunderbird or Microsoft Outlook. Webmail is especially helpful when you are away from your primary home or work computer (where you use Mozilla Thunderbird or Microsoft Outlook).
An overview of how to use the new Webmail system, provided by the Webmail provider, can be downloaded in PDF format using the link, below…
The new Webmail system, once launched, will be available at this address (URL)…
Make sure your web browser’s address bar displays the correct Webmail address (see below) before entering your password…
![]()
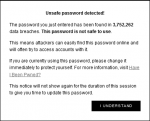
Please note, if you receive an “Unsafe password” warning (an example is displayed below) you should change your password.
Update E-mail Settings in Apple Mail on Mac OS X (Versions ≤ 10.11, El Capitan)

Apple Mail App
Once the E-mail Migration of 2018 is complete, customers with an e-mail address that ends with @widomaker.com (or tni.net) will need to update the settings in their e-mail software. This article contains instructions for customers using the Apple Mail app in OS X e-mail software, on their Apple Mac desktop, or laptop computer.
⚠ If you use Mac OS 10.10 (Yosemite), 10.11 (El Capitan), 10.12 (Sierra), 10.13 (High Sierra), or later, disable (turn off) the Apple Mail option to “Automatically manage connection settings” or “Automatically detect and maintain account settings“ by using the instructions provided by Apple, in their support article titled, “Automatically manage connection settings in Mail on your Mac“. Once that setting has been disabled for both the incoming and outgoing servers, try following the instructions, below.
If you don’t know which version of Mac OS you are using, read the Apple support article titled, “How to find the macOS version number on your Mac“.
How to update settings in Mail on Apple’s Mac OS X
Please note that some screens and steps may vary from the instructions, below, due to differences between versions of OS X, macOS, or the Apple Mail app.
- Open Mail (postage stamp icon) to the main e-mail screen.
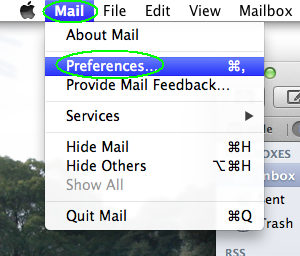
- Click the Mail menu at the top-left of the Mail screen, then click Preferences, as shown in the image, below…
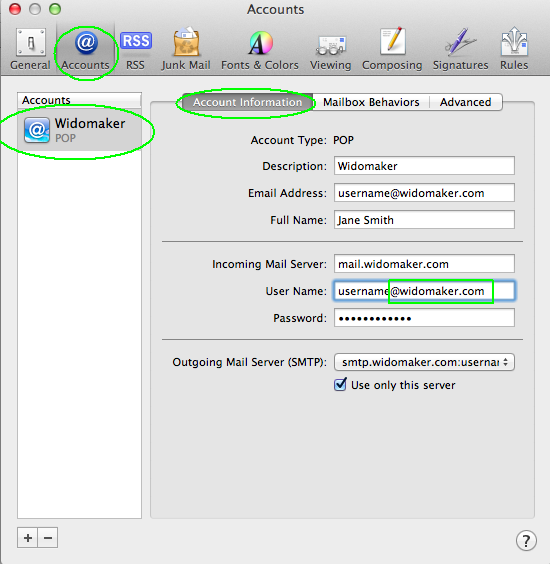
- Click the Accounts tab. Select your Widomaker e-mail account from the Accounts listing in the left side column. Make sure the Account Information tab is selected. Edit the “User Name:” field. Previously, it only contained your username. Make sure that it contains your full e-mail address, instead of just the username, by adding “@widomaker.com” (without quote marks).
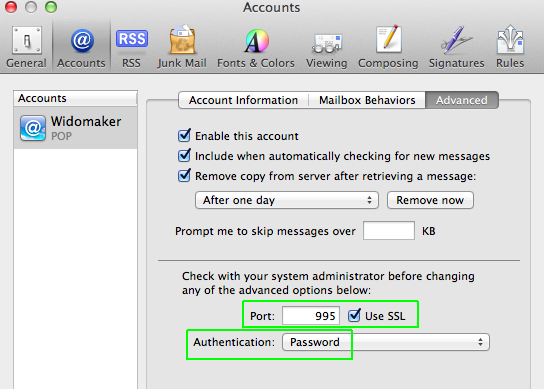
- Click the Advanced tab. Make sure that the other settings match what is highlighted with green, in the image, below.
- Port: 995
- Use SSL: ☑ (checkmarked)
- Authentication: Password
- Once again, click the Account Information tab. Click the drop-down menu to the right of the “Outgoing Mail Server (SMTP):” field. Select “Edit SMTP Server List…“
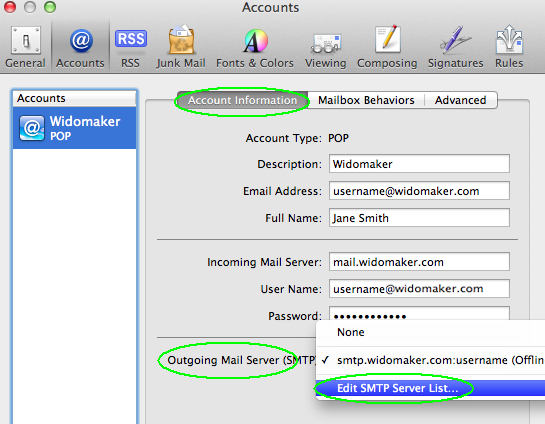
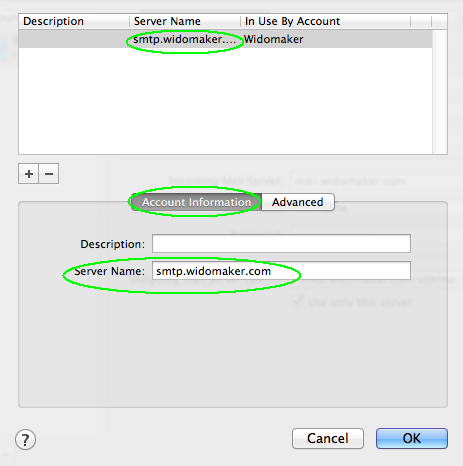
- Select the Widomaker SMTP server. Make sure the Account Information tab is selected. Verify that the Server Name is “smtp.widomaker.com” as shown in the image, below…
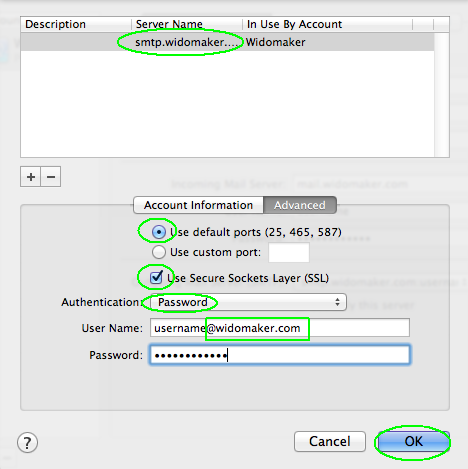
- Click the Advanced tab. Edit the “User Name:” field. Previously, it only contained your username. Make sure that it contains your full e-mail address, instead of just the username, by adding “@widomaker.com” (without quote marks). Make sure that the other settings match what is highlighted with green, in the image, below. Then, click OK.
- Use default ports: ◉ (selected), or Port: 587
- Use secure sockets layer (SSL): ☑ (checkmarked)
- Authentication: Password
- User Name: Your full e-mail address (all lowercase letters)
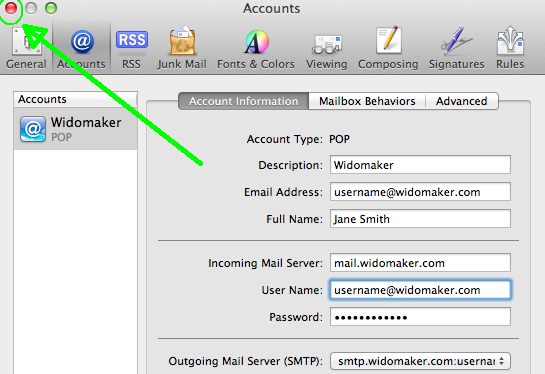
- Close the Accounts window. When asked if you would like to save the changes, select Yes.
- All done! Now test checking and sending mail to confirm Mail is working properly. Sending yourself a test message is an easy way to test that the settings are correct and Mail is working properly.
Troubleshooing Steps
If, after the completing the above steps, you are unable to send or receive mail, please try these troubleshooting steps…
If you have trouble after completing the above steps, make sure all of your accounts in Apple Mail are set to Online as described in the link at Apple’s Support, below…
Apple Support: If a mailbox is offline in Mail on Mac
How to Take Accounts Online in Apple Mail:

If you use Mac OS 10.10 (Yosemite), 10.11 (El Capitan), 10.12 (Sierra), 10.13 (High Sierra), or later, disable (turn off) the Apple Mail option to “Automatically manage connection settings” or “Automatically detect and maintain account settings“ by using the instructions provided by Apple, in their support article titled, “Automatically manage connection settings in Mail on your Mac“. Once that setting has been disabled for both the incoming and outgoing servers, try following the instructions, again, from step number one (1).
Update E-mail Settings in Apple iOS 11.3 on iPhone & iPad
![]()
Once the E-mail Migration of 2018 is complete, customers with an e-mail address that ends with @widomaker.com (or tni.net) will need to update the settings in their e-mail software. This article contains instructions for customers using Apple’s iOS 11.3 on an iPhone or iPad, with the default Apple mobile e-mail app.
- Open the ⚙ Settings app on your Apple iOS device.
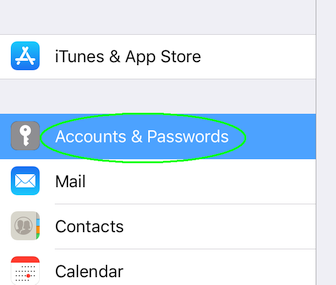
- Scroll down the left-side menu of Settings until you reach Accounts & Passwords. Select or tap on Accounts & Passwords.
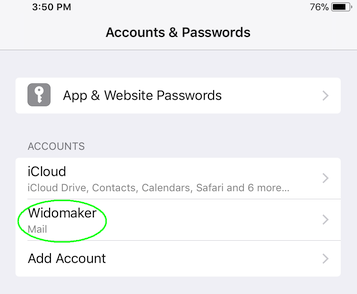
- On the right-side, select or tap your Widomaker e-mail account.
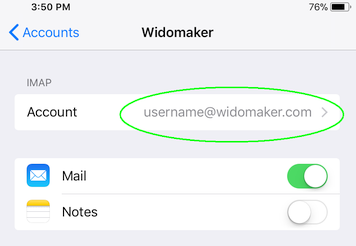
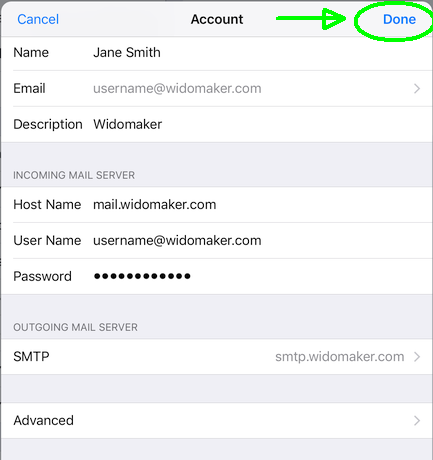
- On the new screen, tap your Widomaker e-mail account.
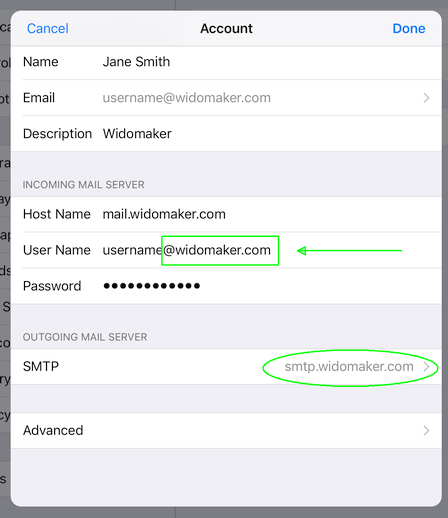
- Edit the “User Name” field. Previously, it only contained your username. Make sure that it contains your full e-mail address, instead of just the username, by adding “@widomaker.com” (without quote marks).
- Tap on the Widomaker SMTP server.
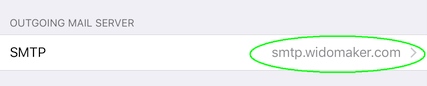
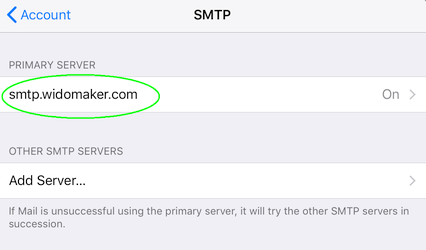
- On the new screen, tap the Widomaker SMTP server.
- Edit the “User Name” field. Previously, it only contained your username. Make sure that it contains your full e-mail address, instead of just the username, by adding “@widomaker.com” (without quote marks).

- Make sure that the other settings match what is highlighted with green rectangles, in the image, below.
- Host Name: smtp.widomaker.com
- User Name: Your full e-mail address (all lowercase letters)
- Use SSL: ON
- Authentication: Password
- Server Port: 587
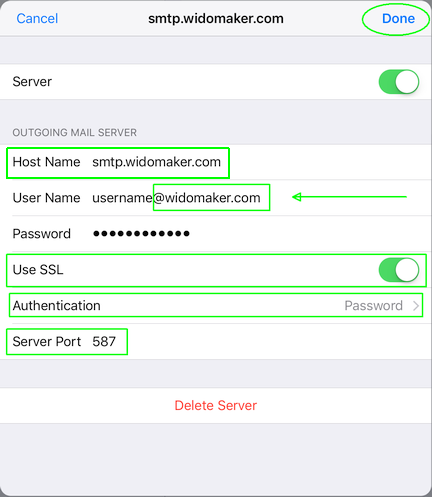
- Tap DONE at the top-right corner.
- Tap the backwards pointing arrow, at the top-left corner, to go back to the Account screen,
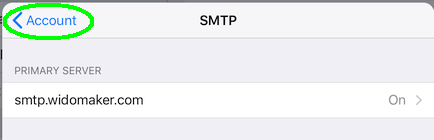
- Tap Done in the top-right corner.
- All done! Press the device’s home button, open the ✉ e-mail app, and test checking and sending mail to confirm Apple’s iOS e-mail app is working properly. Sending yourself a test message is an easy way to test that the settings are correct and e-mail is working properly.
Update E-mail Settings in Android Oreo (8.0 – 8.1)
![]()
Once the E-mail Migration of 2018 is complete, customers with an e-mail address that ends with @widomaker.com (or tni.net) will need to update the settings in their e-mail software. This article contains instructions for customers using Android Oreo (8.0 – 8.1) with the default Google mobile e-mail app, on their Android smartphone, or tablet.
- Open the Google e-mail app on your Android device.
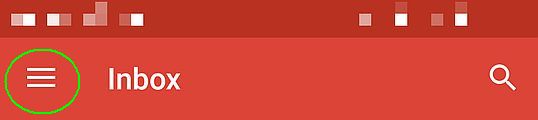
- Select or tap the ≡ options button (triple bar) in the top-left corner of the main e-mail screen.
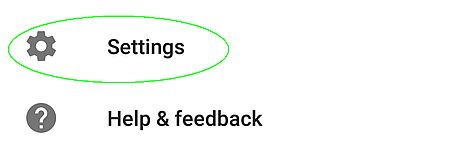
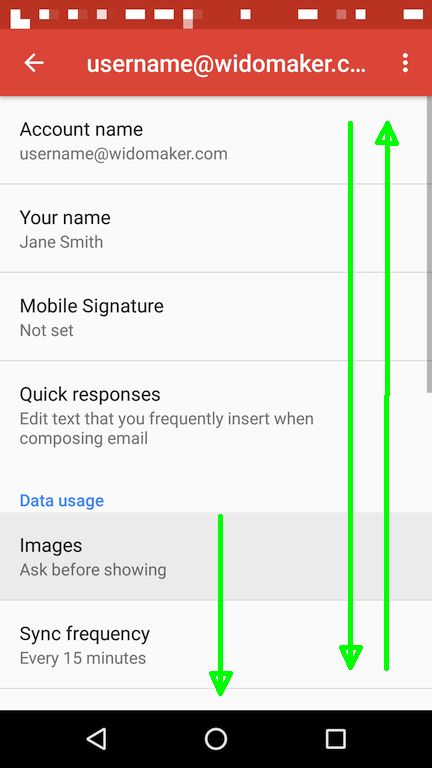
- Tap Settings located toward the bottom of the displayed menu (you might have to scroll down to find it).
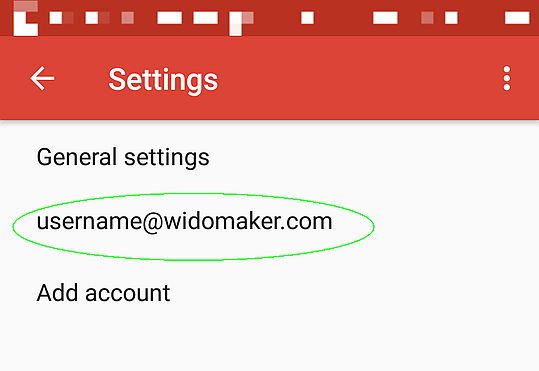
- Tap your Widomaker e-mail account, on the Settings screen.
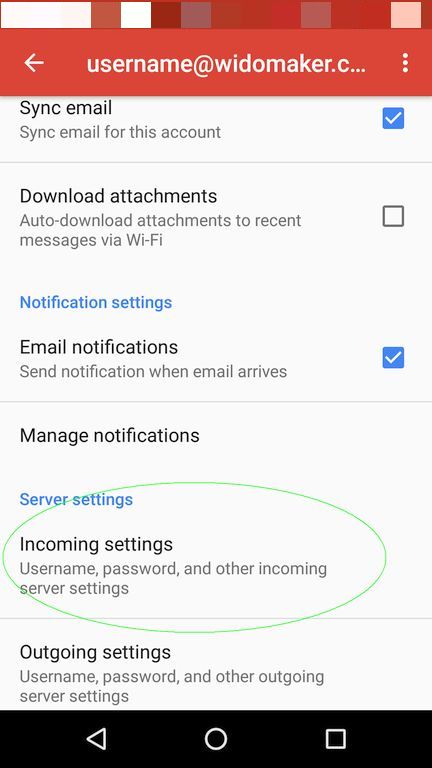
- Once your mail account settings are displayed, scroll down until you see Incoming settings and Outgoing settings, under Server settings.
- Tap on Incoming settings.
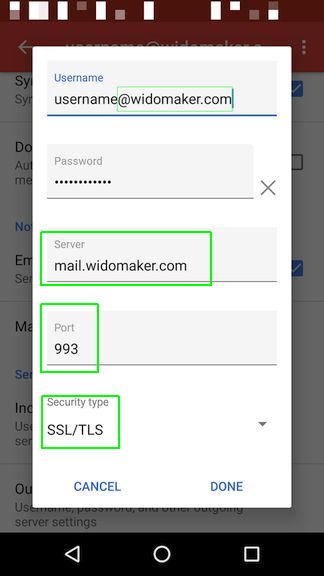
- Edit the “Username” field. Previously, it only contained your username. Make sure that it contains your full e-mail address, instead of just the username, by adding “@widomaker.com” (without quote marks).
- Make sure that the other settings match what is highlighted with green rectangles, in the image, below.
- Server: mail.widomaker.com
- Port: 993
- Security type: SSL/TLS
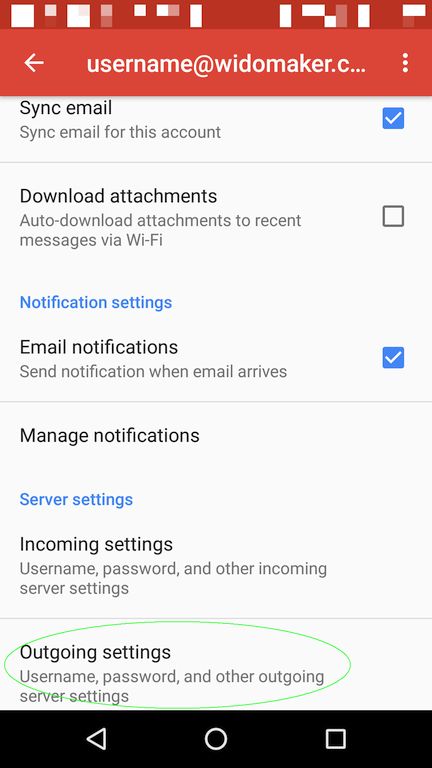
- Tap DONE.
- Tap on Outgoing settings.
- Edit the “Username” field. Previously, it only contained your username. Make sure that it contains your full e-mail address, instead of just the username, by adding “@widomaker.com” (without quote marks).
- Make sure that the other settings match what is highlighted with green rectangles, in the image, below.
- SMTP server: smtp.widomaker.com
- Port: 465
- Security type: SSL/TLS
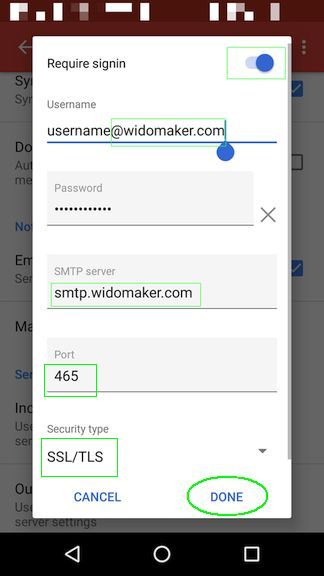
- Tap DONE.
- Tap the back arrow in the top-left corner to return to the main e-mail screen.
- All done! Now test checking and sending mail to confirm Google’s Android e-mail app is working properly. Sending yourself a test message is an easy way to test that the settings are correct and e-mail is working properly.
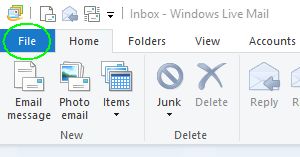
Update E-mail Settings in Windows Live Mail 2012 (WLM)
Windows Live Mail
Once the E-mail Migration of 2018 is complete, customers with an e-mail address that ends with @widomaker.com (or tni.net) will need to update the settings in their e-mail software. This article contains instructions for customers using the Windows Live Mail 2012 e-mail software, on their desktop, or laptop computer.
Please note that Windows Live Mail is no longer a supported e-mail program. As stated on their website, Microsoft stopped supporting Windows Live Mail on, January 10, 2017:
Windows Essentials 2012 suite reached end of support on January 10, 2017.
As of January 10, 2017, Windows Essentials 2012 is no longer supported on Windows 10, and is unavailable for download.
Windows Essentials 2012 included Windows Movie Maker, Windows Photo Gallery, Windows Live Writer, Windows Live Mail, Windows Live Family Safety and the OneDrive desktop app for Windows. Already installed applications will continue to work as they do today.
As a result, the following instructions for WLM are provided as a convenience, only. No technical support is available for software that has reached the end of its support.
How to update settings in Windows Live Mail 2012 (WLM)
- Open Windows Live Mail 2012 (WLM) to the main e-mail screen.
- Click the FILE menu at the top-left of the WLM window, as shown in the image, below…
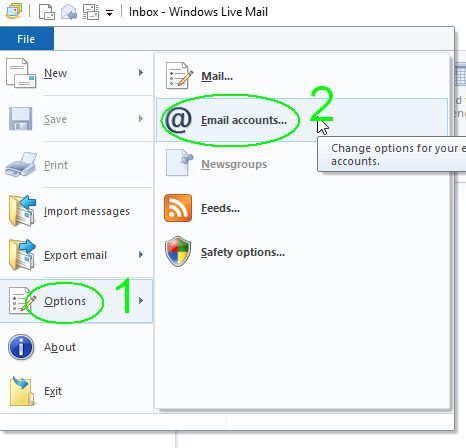
- Click Options then “@ Email accounts…“, as shown in the image, below…
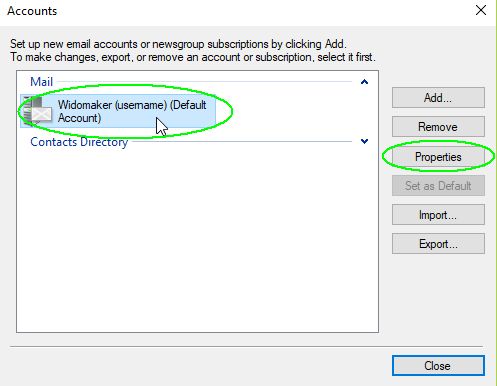
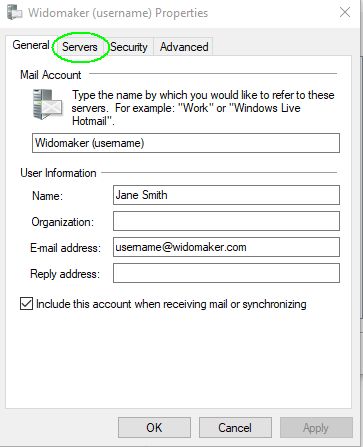
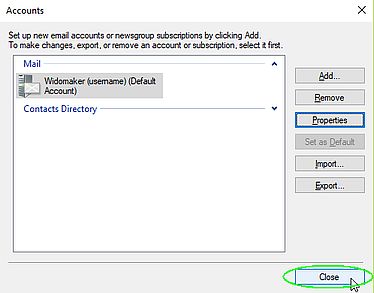
- Select your Widomaker e-mail account, then click the Properties button, on the right side of the window, as shown in the image, below…
- Once the Properties window is displayed, click the Servers tab, as shown in the image, below…
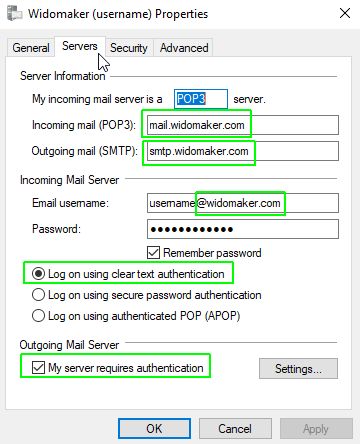
- Once the Servers tab is open, edit the “Email username:” field. Previously, it only contained your username. Make sure that it contains your full e-mail address, instead of just the username, by adding “@widomaker.com” (without quote marks).

- Make sure that the other settings match what is highlighted with green rectangles, in the image, below.
- Incoming mail (POP3): mail.widomaker.com
- Outgoing mail (SMTP): smtp.widomaker.com
- Email username: Your full e-mail address (all lowercase letters)
- Log on using cleartext authentication: ◉ (selected)
- My server requires authentication: ☑ (checkmarked)
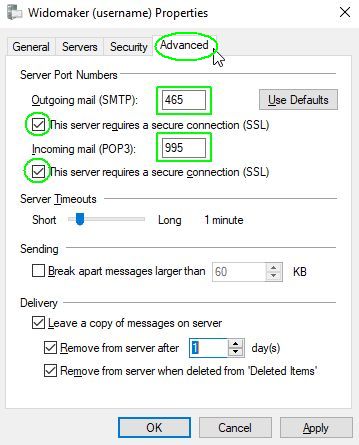
- Click the Advanced tab. Make sure that the other settings match what is highlighted with green, in the image, below.
- Server Port Numbers
- Outgoing mail (SMTP): 465
- This server requires a secure connection (SSL): ☑ (checkmarked)
- Incoming mail (POP3): 995
- This server requires a secure connection (SSL): ☑ (checkmarked)
- Server Port Numbers
- Click OK.
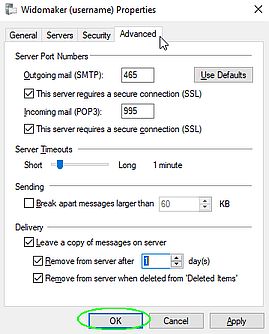
- Click Close.
- All done! Now test checking and sending mail to confirm Windows Live Mail 2012 is working properly. Sending yourself a test message is an easy way to test that the settings are correct and WLM is working properly.
Update E-mail Settings in Microsoft Outlook 2010
![]()
Once the E-mail Migration of 2018 is complete, customers with an e-mail address that ends with @widomaker.com (or tni.net) will need to update the settings in their e-mail software. This article contains instructions for customers using the Microsoft Outlook 2010 (14.0) e-mail software, on their desktop, or laptop computer.
- Open Microsoft Outlook to the main e-mail screen.
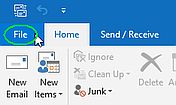
- Click the FILE menu at the top-left of the Outlook window, as shown in the image, below…
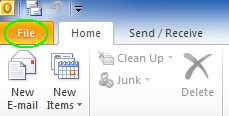
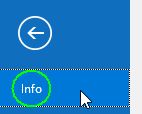
- Click INFO on the left side menu, as shown in the image, below…
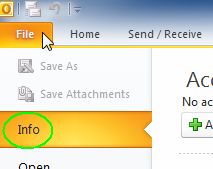
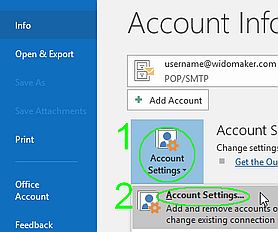
- Click the Account Settings square, then “Account Settings…” in the drop-down menu, as shown in the image, below…

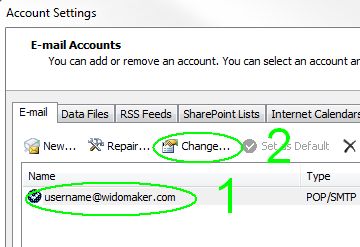
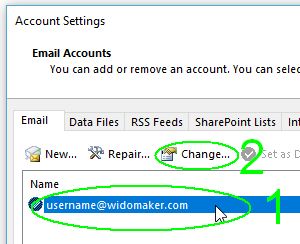
- Once the Account Settings (Email Accounts) window is displayed, select your e-mail account in the centermost window, then click the Change button, as shown in the image, below…
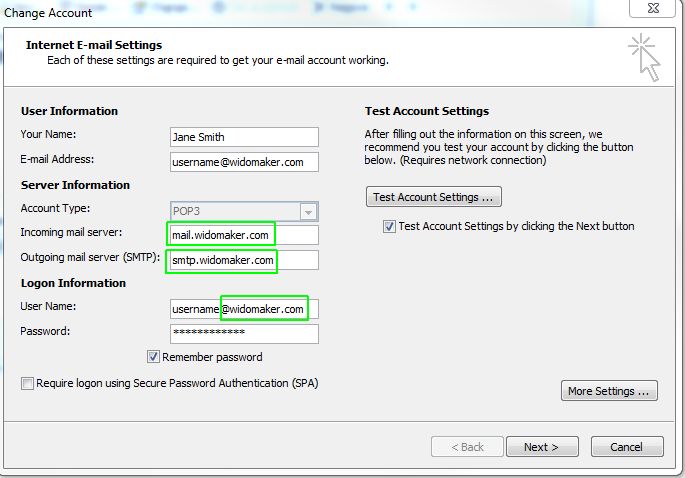
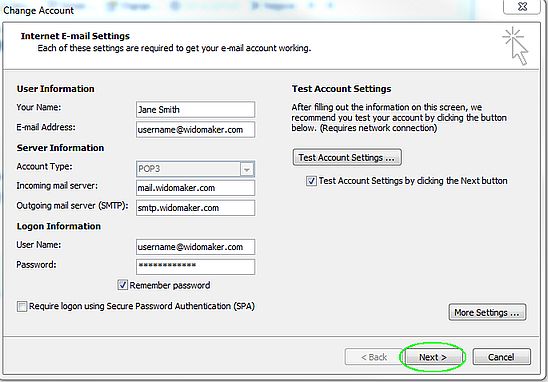
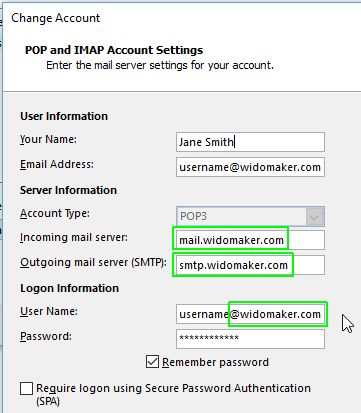
- Once the Change Account (Internet E-mail Settings) window is open, edit the “User Name:” field. Previously, it only contained your username. Make sure that it contains your full e-mail address, instead of just the username, by adding “@widomaker.com” (without quote marks).

- Make sure that the other settings match what is highlighted with green rectangles, in the image, below.
- Incoming mail server: mail.widomaker.com
- Outgoing mail server (SMTP): smtp.widomaker.com
- User Name: Your full e-mail address (all lowercase letters)
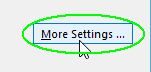
- Click More Settings in the bottom-right corner of the Change Account (POP Account Settings) window.
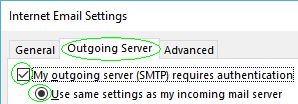
- Click the Outgoing Server tab. Verify that “My outgoing server (SMTP) requires authentication” is checkmarked ☑ and “Use same settings as my incoming server” is selected.
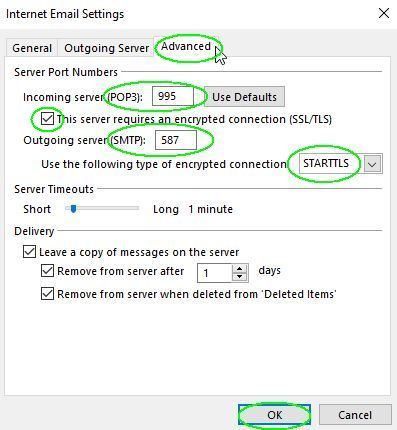
- Click the Advanced tab. Make sure that the settings match what is highlighted with green rectangles, in the image, below.
- Server Port Numbers
- Incoming server (POP3): 995
- This server requires an encrypted connection (SSL/TLS): ☑ (checkmarked)
- Outgoing server (SMTP): 587
- Use the following type of encrypted connection: Auto or STARTTLS
- Server Port Numbers
- Click OK.
- Click the Outgoing Server tab. Verify that “My outgoing server (SMTP) requires authentication” is checkmarked ☑ and “Use same settings as my incoming server” is selected.
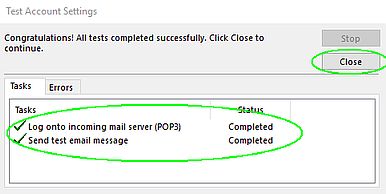
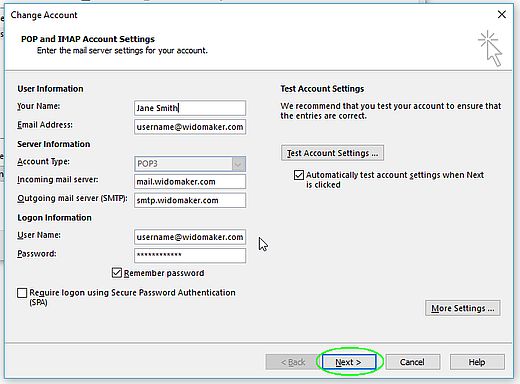
- Click NEXT.
- Outlook will test the settings. Once the test has finished, click CLOSE in the Test Account Settings window.
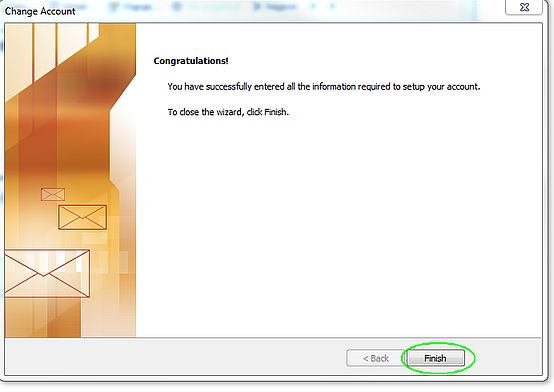
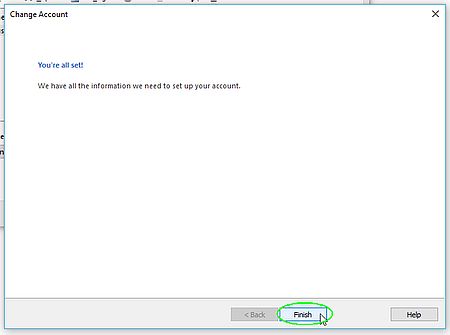
- Click FINISH.
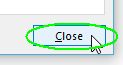
- Click CLOSE.
- All done! Now test checking and sending mail to confirm Outlook is working properly. Sending yourself a test message is an easy way to test that the settings are correct and Outlook is working properly.
Update E-mail Settings in Microsoft Outlook 2013 & 2016
Microsoft Outlook
Once the E-mail Migration of 2018 is complete, customers with an e-mail address that ends with @widomaker.com (or tni.net) will need to update the settings in their e-mail software. This article contains instructions for customers using the Microsoft Outlook 2013 (15.0) or 2016 (16.0) e-mail software, on their desktop, or laptop computer.
- Open Microsoft Outlook to the main e-mail screen.
- Click the FILE menu at the top-left of the Outlook window, as shown in the image, below…
- Click INFO on the left side menu, as shown in the image, below…
- Click the Account Settings square, then “Account Settings…” in the drop-down menu, as shown in the image, below…
- Once the Account Settings (Email Accounts) window is displayed, select your e-mail account in the centermost window, then click the Change button, as shown in the image, below…
- Once the Change Account (POP Account Settings) window is open, edit the “User Name:” field. Previously, it only contained your username. Make sure that it contains your full e-mail address, instead of just the username, by adding “@widomaker.com” (without quote marks).
- Make sure that the other settings match what is highlighted with green rectangles, in the image, below.
- Incoming mail server: mail.widomaker.com
- Outgoing mail server (SMTP): smtp.widomaker.com
- User Name: Your full e-mail address (all lowercase letters)
- Click More Settings in the bottom-right corner of the Change Account (POP Account Settings) window.
- Click the Outgoing Server tab. Verify that “My outgoing server (SMTP) requires authentication” is checkmarked ☑ and “Use same settings as my incoming server” is selected.
- Click the Advanced tab. Make sure that the settings match what is highlighted with green rectangles, in the image, below.
- Server Port Numbers
- Incoming server (POP3): 995
- This server requires an encrypted connection (SSL/TLS): ☑ (checkmarked)
- Outgoing server (SMTP): 587
- Use the following type of encrypted connection: Auto or STARTTLS
- Server Port Numbers
- Click OK.
- Click the Outgoing Server tab. Verify that “My outgoing server (SMTP) requires authentication” is checkmarked ☑ and “Use same settings as my incoming server” is selected.
- Click NEXT.
- Outlook will test the settings. Once the test has finished, click CLOSE in the Test Account Settings window.
- Click FINISH.
- Click CLOSE.
- All done! Now test checking and sending mail to confirm Outlook is working properly. Sending yourself a test message is an easy way to test that the settings are correct and Outlook is working properly.
Update E-mail Settings in Mozilla Thunderbird
Mozilla Thunderbird
- Open Thunderbird to the main e-mail screen.
- Open Thunderbird’s Account Settings window with the following instructions:
- Hold down the ALT key on the keyboard.
- While the ALT key is being held down, also press the T key, to open the TOOLS menu.
- Once the TOOLS menu is open, click on Account Settings to open the Account Settings window.
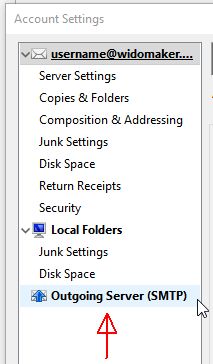
- Once the Account Settings window is displayed, click on Server Settings, located on the left side of the window, under your e-mail address. The image, below, points to Server Settings using a red arrow pointing to the left.
Instructions continue after the image, below…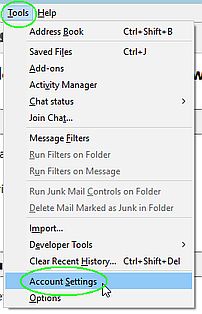
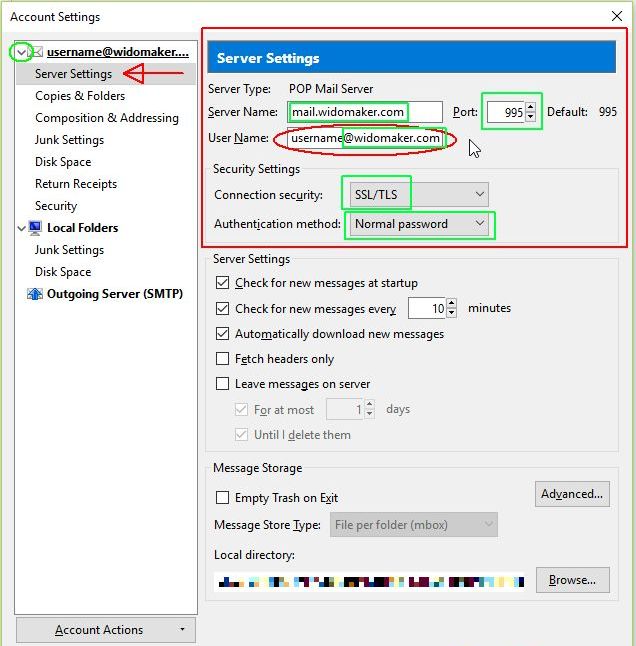
- Edit the “User Name:” field. Previously, it only contained your username. Make sure that it contains your full e-mail address, instead of just the username, by adding “@widomaker.com” (without quote marks).
- Make sure that the other settings match what is highlighted with green rectangles, in the image, below.
- Server Name: mail.widomaker.com
- Port: 995
- User Name: Your full e-mail address (all lowercase letters)
- Connection security: SSL/TLS
- Authentication method: Normal password
- Edit the Outgoing Server Settings…
- Click on ✉ Outgoing Server (SMTP), located at the bottom of the left side column, in the Account Settings window…
Instructions continue after the image, below…
- Select the Widomaker SMTP server, from the list, then click the EDIT button, to the right side of the window, as shown in the image, below…
- Edit the “User Name:” field, located in the SMTP Server window. Previously, it only contained your username. Make sure that it contains your full e-mail address, instead of just the username, by adding “@widomaker.com” (without quote marks).
- Make sure that the other settings match what is highlighted with green rectangles, in the image, below.
- Server Name: smtp.widomaker.com
- Port: 587
- Connection security: STARTTLS
- Authentication method: Normal password
- User Name: Your full e-mail address (all lowercase letters)
- Once you have made the necessary changes, in the SMTP Server window, click OK.
Instructions continue after the image, below…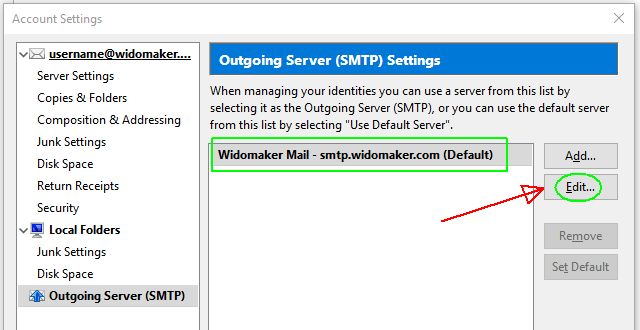 Instructions continue after the image, below…
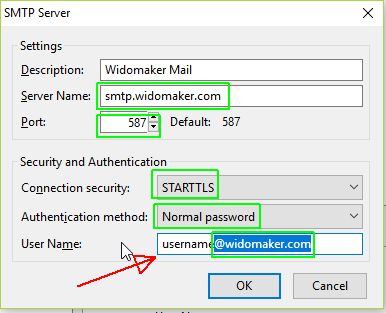
- Click on ✉ Outgoing Server (SMTP), located at the bottom of the left side column, in the Account Settings window…
- The Account Settings window should be displayed. Click OK at the bottom of the Account Settings window, as shown in the image, below…
- All done! Now test checking and sending mail to confirm Thunderbird is working properly. Sending yourself a test message is an easy way to test that the settings are correct and Thunderbird is working properly.
Thunderbird account settings.


